
Making Home Brewed Kombucha, step-by-step demonstration
Make your own Kombucha
So you were thinking about making your own Kombucha. The good news is that it really isn’t that hard once you know what you are doing. All you need is a couple of cups of Kombucha, a SCOBY (Symbiotic Culture of Bacteria and Yeast), tea, sugar, a glass jar to brew it in and something to put it in when you are done brewing it and waiting to drink it.
In the video below, Doc T shows you how easy it is. He also goes into bottling and flavoring the Kombucha after it is brewed.
What exactly is Kombucha? Kombucha is a fermented sweetened tea. In the fermenting process, it creates probiotics which are supposed to contribute to a healthy gut culture. To ferment, it needs a culture of yeast and bacteria called a SCOBY, tea and sugar. The result is a tea based product that is effervescent, or bubbly, light and somewhere between sweet and tangy. It is quite refreshing. The longer you let it ferment, the more it will move from sweet to tangy. Also, the more SCOBY you have in the container the faster it will ferment. So you need to keep a eye on it, and start tasting after about the fifth day.
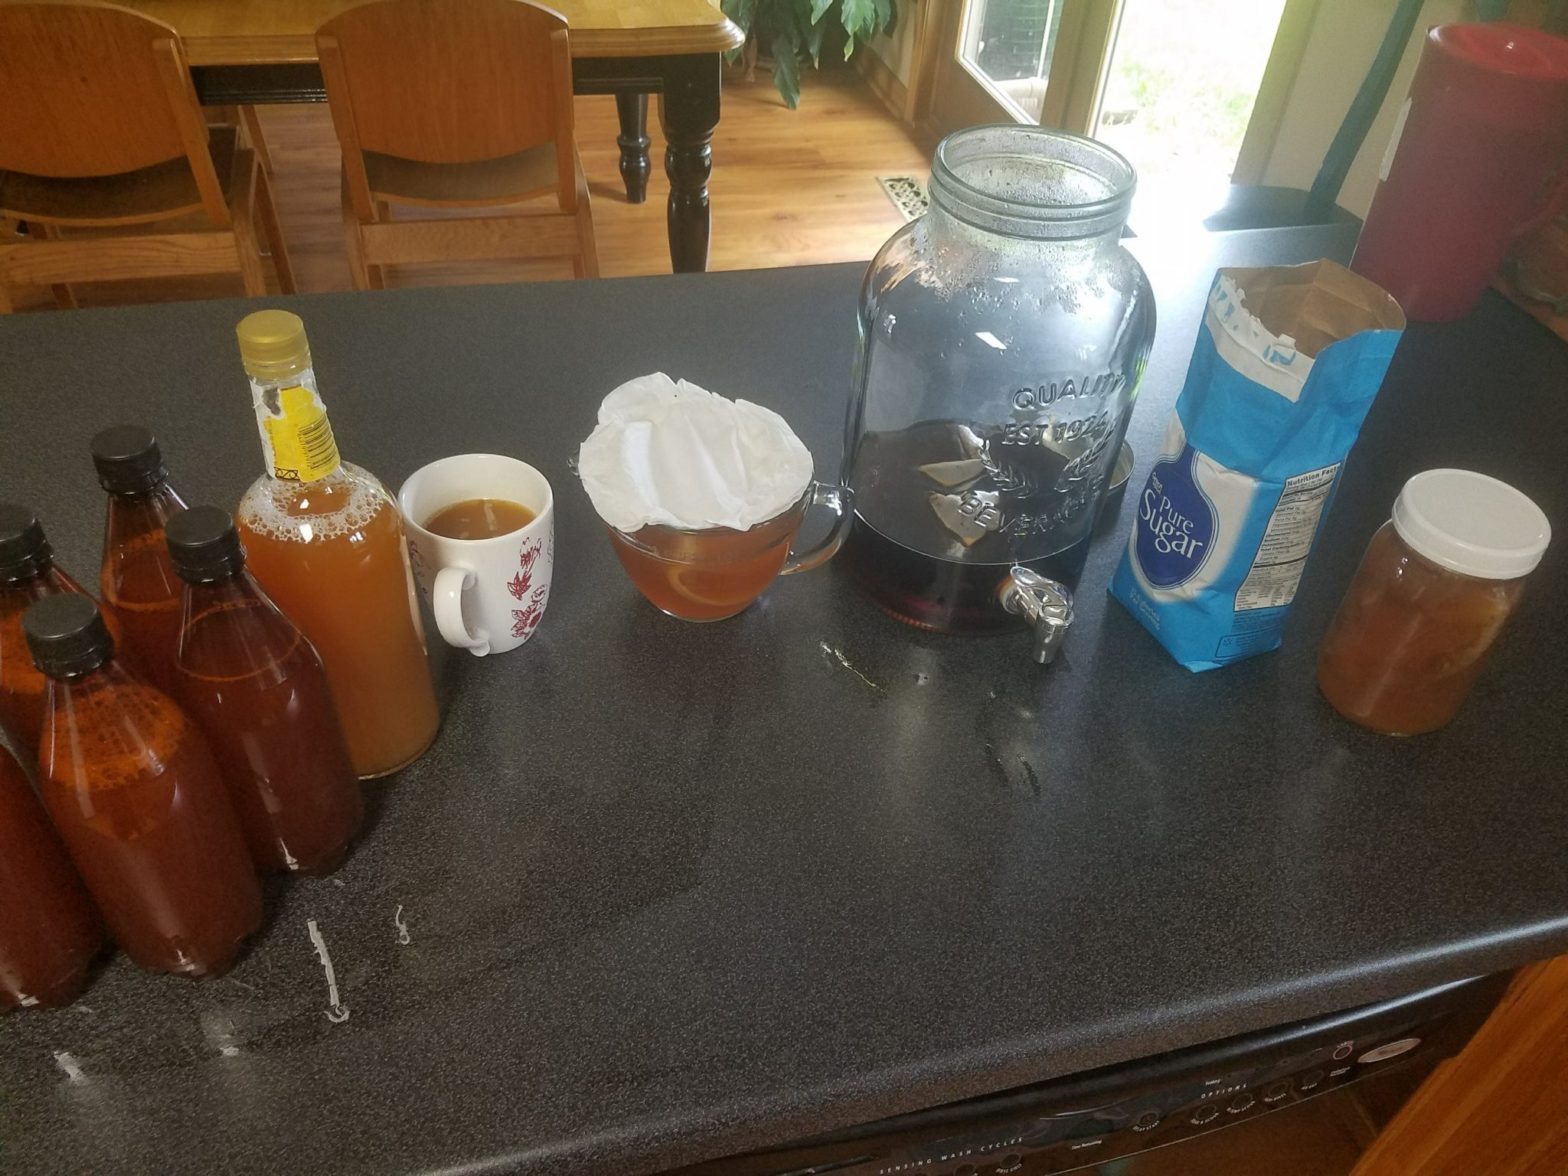
For me, I prefer the taste that I get out of the Kombucha when I bottle and flavor it on about the 7th or 8th day. I haven’t experimented with flavors except for the combination of Honey and Lemon I first tried. The way that I make Kombucha, I make a new batch on the same day I bottle. Before I bottle, I add a mixture of equal parts sugar and lemon juice (make sure you take out the starter Kombucha you will need for the next batch first – you will need 2 cups per gallon). So if I am making 1 gallon of Kombucha, I will add 1/2 cup of lemon and 1/2 cup of honey before I bottle it.
After I bottle it, I let is sit in the bottles at room temperature for about 3 days. That gives it time to continue the fermenting process and self-carbonate in the bottle. The Kombucha eats the honey and converts it to carbon-dioxide inside the beverage. That is what gives it the bubbly, fizzy nature. After the 3rd day, I refrigerate it to stop the fermentation. You will find that there is a little bit of the SCOBY that has formed in the bottle. You can filter it out, pour it in your glass and not drink it, or go ahead and drink it. It won’t hurt you, but it has a texture that isn’t real pleasant to have in your mouth.
The thing that is important to remember, is that you don’t need the jugs I used, or the brown plastic bottles. What matters is the process of making it. Get the recipe right, keep your equipment clean and you can make your own Kombucha. The literature says to stay away from metal containers when processing or storing your beverage.

If you have a friend that makes Kombucha, that is the best place to get a SCOBY. If you don’t have a friend, you can order it online and the SCOBY will come with enough kombucha to start your first batch. Each time you make Kombucha, you will get more and more SCOBY. After a batch or two, it is ready to divide. When you get to that point, it is a good idea to keep a spare SCOBY around just in case something goes wrong.
What do I mean by “something goes wrong”? So far, the only thing I know that can go wrong is to get mold on your SCOBY. If you read other articles, they will say it doesn’t happen often. But it happened on my second batch. I am not sure how it happened, but I looked in one day and there was fuzz on top of the SCOBY. When this happens, throw it away. The Kombucha and the SCOBY and start fresh.


You can store a great deal of SCOBY by putting it into a jar with a batch of kombucha. You will periodically need to give it some fresh tea to live on, but multiple SCOBY can sit in the same jar of Kombucha that serves as a storage vessel for your spares. Make sure it can still breath.
Give it a try, it is easy and home brewed Kombucha gives you much more control over the process so you can fine tune the flavor to one you like.
Recipe for 1 gallon
1 SCOBY
2 cups of Kombucha per gallon of tea you want to make
Black or Green Tea (8 normal size bags, or I prefer to use the large bag designed for making 1 gallon of tea. You can also use loose tea, but I don’t know the quantity)
1 cup of sugar per gallon of tea.
Optional for flavoring when bottling:
1/2 cup of lemon juice and
1/2 cup of honey
Boil water and add to Tea and sugar mixture. Let it steep until it has cooled to room temperature. You do not want to add your SCOBY and Kombucha starter to Hot tea, you will kill the culture. I will make a half gallon of tea and dilute it with a half gallon of cold water after it has steeped to help with the cooling process if I am in a hurry.
Place the sweet tea in the container(s) you will be using to brew your Kombucha. Add 2 cups of Kombucha per gallon. This increases the acidity of the tea to prevent bad bacteria from taking a hold.
Place your SCOBY in the same jar. It may sink, it may float, it will do it’s own thing. But, you will notice after a couple of days that a new SCOBY will start to form on the top of the tea, that is when you know it is working right. Each batch the SCOBY will get thicker and you will eventually need to divide it. Use the fresh layers on the top to start your next batch. The SCOBY will be ugly. The color will depend upon the tea strength and other factors. It ranges from white to brown. It should look wet and rubbery on top. It should not have fuzz. Fuzz indicates that you have mold.
On the top of the container you are brewing in, you need to use a cover that will let air pass, but not bugs or mold. I use two layers of coffee filters secured with a rubber band or similar. Cheese cloth is too porous and will let the bad stuff in, so it needs to be a tighter weave than that.
Place your brew in a place out of direct sunlight, where it is warm and where it does not get a breeze. I place a shirt around my jar to keep out the light, but leave it so that the cover is not under the shirt. The neck hole works great for this.
Let it sit. After 5 days I will start to taste it to see where it is in the fermentation process. After a few batches, you will determine how long you want to let it brew. Usually I will bottle mine on the 7th or 8th day. Before you flavor and bottle, take out the 2 cups per gallon you will need for the next batch.
This is when you can add flavoring. Some people use berries, or other items to flavor it. I prefer a mixture of honey and lemon juice. Add the flavoring and then bottle your Kombucha. You can drink it right away, or you can let it sit out. I let it sit out at room temperature for 3 days to carbonate the brew. Then I move it to the refrigerator.
After you have bottled the last batch, wash your jug and start your next batch. I now use a sterilizing solution to clean all of my equipment and bottles between batches after I got the mold on one batch. When using a jug with a spigot, you need to take the spigot apart and clean it between batches because the SCOBY will take hold in the spigot as well. It is a compromise. It makes it easier to taste, but it requires extra cleaning. I suspect that is how the mold took hold in my second batch.
Happy Brewing, hope you like it.
Peace!